Online Help


Using the interface
Return to index

Topics
Introduction, Menu, Using the forms, Panel commands
  Introduction  
  The purpose of this document is to explain how the web application interface functions in general.

The data required by the user is made available to be displayed or changed by a series of forms; each of them is connected to a set of different functions and data.

The menu positioned to the left of the browser is used to open the application forms. Once the forms are open, additional commands will be available for managing the data they contain.

Each form contains one or more panels, which contain the data of interest. The panel commands can be used to perform operations directly on this data.
^ Top

  Menu Using the application menu
 

example of an application menu
The application menu consists of a list of groups of commands. Initially, each group is closed and does not display the commands it contains. Simply click on the name of a group to open it, so it displays the commands it contains.

Immediately after the application is opened, the system will not display open forms, but a welcome page. The menu commands must be used to open a form and use the data.
In the image shown to the left, the menu shows one group of commands (tables) that contains various commands, each of which opens a form. By clicking on Products for example, a form opens that shows a list of products.

To hide the group commands, simply click on its name again.
^ Top

  Using the forms Using and managing the application forms
 

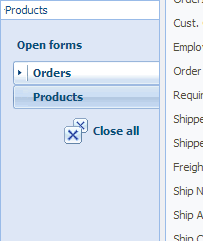
example of a list of open forms


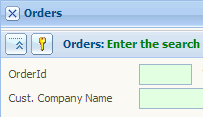
example of a form caption
 
We have seen that it is possible to access the various application forms using the menu commands.

Multiple forms can be opened at the same time, and in this case the list of the open forms is displayed immediately below the application menu with a tabbed menu, as can be seen in the image to the side.

The example shows two open forms: orders and products. The name of the active form is shown by the white tab. Furthermore, the name of the active form appears in the caption bar of the form, as shown by the second example on the left.
The caption bar also contains the form's close button: . By clicking on this button, the current form is closed and another one of the active forms will be displayed.
Below the list of open forms we can see the button, which closes all the open forms and displays the welcome page.

In the top right corner of the browser there is a button that is the same as the one used to close a single window. This button closes the entire work session by executing the user logout (disconnection) and returning the application to the login form.

Finally, we can see that in the browser status bar, which is the grey area in the lower section of the browser, informational messages are displayed regarding the form field where the cursor is positioned (to position the cursor over a field, simply click on it once).
 
Form commands Commands available for displaying and managing forms
  The (<) button to the upper left, next to the application name, hides the menu increasing the area available for displaying and managing data. The (>) button (which is displayed only when the menu is hidden) performs instead the inverse operation.
  The function of the (-) button is similar to what was shown above. It reduces a part of the relative form, reducing it to a simple row, whereas the (+) button performs the inverse operation.
 
The closed lock button indicates that the panel data is locked, and therefore as long as the form remains in this status, the data cannot be edited. Clicking on the form unlocks it, making it possible to edit the data and in this case, the open lock button is shown, which performs the inverse operation.
 
^ Top

  Panels Managing the data contained in a panel
 

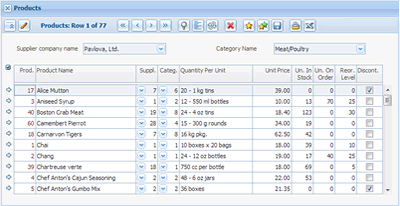
example of a list panel


panel in "search criteria" status


panel in "data display" status


panel in "modified data" status
 

Normally when a form is opened, the panel prepares for the insertion of the search criteria. In this way, you can select the data that interests you by entering "examples" in the fields. To perform the search click on the button. If no example is entered, all data will be found. You can see if the panel is in this status by the text in the caption row, as shown in the image to the left.

To perform special searches, the special characters indicated in the following frame can be used.

After pressing the "execute search" button, the data will be shown on the screen. At this point, you can scroll or edit the data. If you edit the data, the panel will signal this in the caption row, as shown in the images to the left. After completing the changes, press the button to save the changes or press the button to cancel them.

The other buttons in the caption bar of the panel are shown in the following frames.

The form may contain other commands that activate specific functions; in this case refer to the specific documentation of the form for additional information.


Search filters The special characters used to enter the search criteria
> [value]
finds the data with a value in that field that is greater than or equal to what is entered
< [value]
finds the data with a value in that field that is less than or equal to what is entered
% or *
this is a "wild card" character that indicates that any value can be in its place (for example %liam finds all records whose criteria field finishes with "liam", whereas entering %li% searches for all data that has a value in that field that contains "li", in this case, the word wilLIam would be found).
=
finds the records that have a value in that field equal to what is indicated
#
finds the records that have a value in that field different than what is indicated
.
finds all the records where a value was entered in that field
!
finds all the records where that field was left empty
[value1]:[value2]

finds all the records whose value of the selected field lies between value1 and value2

combinations
It is possible to combine the effects of the various operators using semicolons and colons (e.g. <10; 20:30 - finds all the values less than or equal to 10 or those between 20 and 30).


Panel commands Buttons available in the panel caption bar Navigation commands  
Puts the panel in search mode Goes to the next row
Used to change the current display mode.

In "detail" mode, the window shows the data that was found one row at a time, with a graphic that is usually more convenient for entering and editing data. In "list" mode, multiple results are presented at the same time in a table. In this mode there may be some fields outside of the table in order to better display the most important data relative to the currently selected row.
Goes to the previous row
Undoes the changes made to the data Goes to the last row
Updates the panel by executing a new search Goes to the first row
It moves to a new row and prepares for insertion    
Copies the current row    
Deletes the current row    
Saves the changes made to the panel data    
Activates the print function, if active for this panel.    
   
 
^ Top